
Tempura Cheesecake Made Easy: Step-by-Step Recipe
Introduction
Welcome to a culinary adventure where unexpected flavors come together in an irresistible fusion. In this article, we explore the innovative world of tempura cheesecake a dessert that marries the light, crispy texture of tempura with the rich, creamy indulgence of traditional cheesecake.
Imagine biting into a dessert that surprises you with a perfect balance of crunch and smoothness. The tempura cheesecake is not only a feast for your taste buds but also a visual delight that promises to captivate anyone who loves to experiment with new flavors. Whether you’re a seasoned chef or a curious foodie, this unique recipe invites you to break free from the ordinary and discover a fresh take on dessert making.
As you read on, you’ll uncover everything you need to know about creating this standout dessert—from the essential ingredients and step-by-step instructions to smart tips, storage methods, presentation ideas, and answers to frequently asked questions. Get ready to be inspired and tempted by a dessert that redefines what a cheesecake can be.
Table of Contents
Ingredients
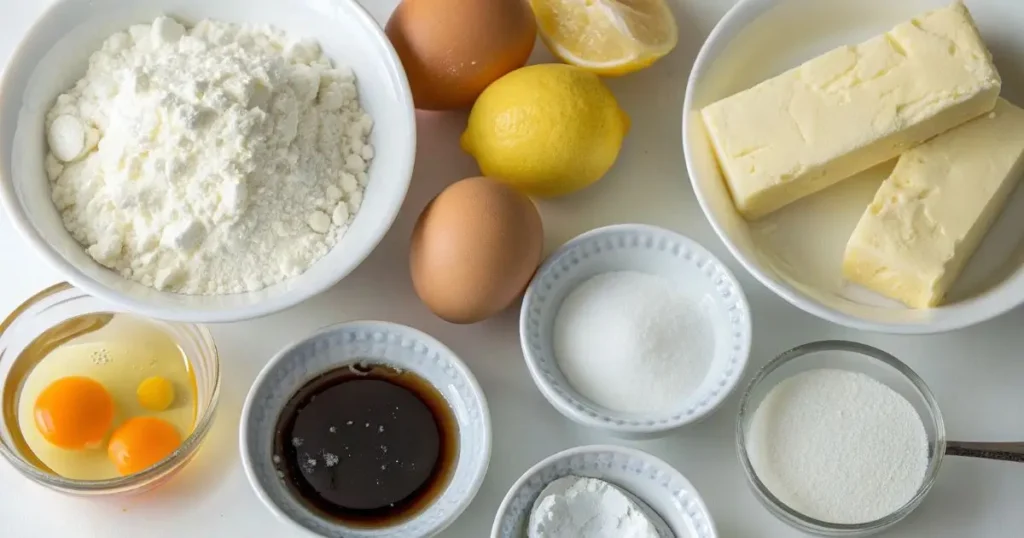
Creating the perfect tempura cheesecake starts with gathering the right ingredients. Below is a clear, organized list of everything you’ll need to prepare this unique dessert. Each component plays a crucial role in achieving that ideal balance of a crisp, light tempura coating and a smooth, creamy cheesecake center.
For the Cheesecake Filling:
- Cream Cheese (400g, softened): The base for a rich and smooth texture.
- Granulated Sugar (100g): Provides sweetness and helps stabilize the filling.
- Large Eggs (2): Essential for binding the ingredients together.
- Vanilla Extract (1 tsp): Adds a warm, aromatic flavor.
- Heavy Cream (150 ml): Contributes to the filling’s creaminess and smooth consistency.
- Lemon Juice (1 tbsp): A touch of acidity to balance the sweetness.
- All-Purpose Flour (1 tbsp): Helps set the filling for a firmer consistency.
For the Tempura Batter:
- All-Purpose Flour (100g): The main ingredient for a light and crispy batter.
- Cornstarch (50g): Ensures extra crispiness by reducing gluten formation.
- Baking Powder (1/2 tsp): Provides a slight lift to create an airy texture.
- Salt (1/4 tsp): Enhances the overall flavor of the batter.
- Ice-Cold Sparkling Water (150 ml): The cold temperature is key to achieving that delicate, crunchy coating.
For Serving and Garnishing (Optional):
- Fresh Berries: A burst of color and tartness that complements the cheesecake.
- Powdered Sugar: For a light dusting that adds a touch of elegance.
- Maple Syrup or Chocolate Sauce: Drizzled over the top for an extra layer of flavor.
This comprehensive list ensures you have every essential element for a flawless tempura cheesecake. Once you’re ready with all these ingredients, we can move on to the step-by-step instructions for preparing this extraordinary dessert.
Step-by-Step Instructions
- Prepare the Cheesecake Filling:
Preheat your oven to 160°C (320°F). In a large bowl, beat the softened cream cheese with granulated sugar until the mixture is smooth and creamy. Incorporate the eggs individually, ensuring each is fully blended before adding the next. Then stir in the vanilla extract, heavy cream, lemon juice, and sifted all-purpose flour until you have a well-combined, lump-free batter. Pour this mixture into a springform pan lined with parchment paper, smooth the top with a spatula, and bake for 45–50 minutes. The outer edges should be firm, while the center retains a gentle wobble. Remove from the oven, let it cool to room temperature, then refrigerate for at least 4 hours (or overnight) so the cheesecake becomes firm enough for the next steps. - Prepare the Tempura Batter:
In another bowl, sift together the all-purpose flour, cornstarch, baking powder, and salt. Gradually whisk in ice-cold sparkling water until the batter is just combined; leave a few small lumps in the mixture to help achieve a light, crispy coating when fried. - Chill and Cut the Cheesecake:
Once the cheesecake has set completely in the refrigerator, remove it from the pan and place it on a clean cutting board. Using a sharp knife, cut the cheesecake into evenly sized pieces—squares or any shape you prefer. The pieces need to be firm enough to hold their shape during frying. - Fry the Cheesecake Pieces:
Heat a generous amount of vegetable oil in a deep pan or fryer until it reaches 180°C (350°F). Dip each cheesecake piece quickly into the tempura batter, ensuring it is thoroughly and evenly coated. Carefully lower the coated pieces into the hot oil. Fry them in small batches for about 2–3 minutes, or until the batter turns a light, golden brown and becomes delightfully crispy. Remove the pieces with a slotted spoon and drain on paper towels to remove any excess oil. - Final Touches:
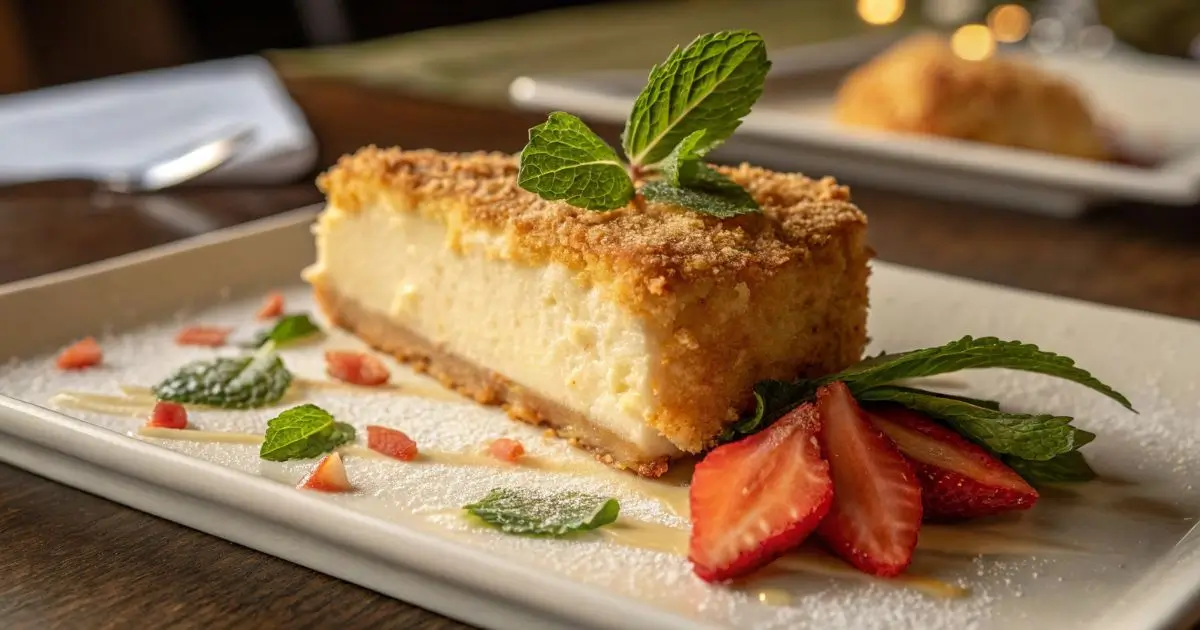
Allow the fried tempura cheesecake pieces to cool slightly before serving. This step ensures that you experience the delightful contrast between the warm, crispy exterior and the cool, creamy center. Enjoy your creation immediately, and if desired, add a garnish of fresh berries, a dusting of powdered sugar, or a drizzle of maple syrup or chocolate sauce for extra flair.
Tips and Tricks for the Recipe
Creating the perfect tempura cheesecake involves attention to detail and a few insider tips to ensure success. Here are some valuable suggestions to help you achieve a delightful dessert:
- Maintain Cold Ingredients:
- Cheesecake Firmness: Ensure the cheesecake is thoroughly chilled before cutting and frying. A well-set, cold cheesecake holds its shape better during the frying process.
- Tempura Batter: Use ice-cold sparkling water when preparing the tempura batter. The cold temperature is crucial for achieving a light and crispy coating.
- Optimal Frying Conditions:
- Oil Temperature: Maintain the oil at a steady 180°C (350°F). Using a kitchen thermometer can help monitor the temperature accurately.
- Batch Frying: Avoid overcrowding the pan. Frying a few pieces at a time ensures even cooking and prevents the oil temperature from dropping.
- Batter Consistency:
- Gentle Mixing: When combining the dry ingredients with the sparkling water, mix gently to keep the batter slightly lumpy.
- Immediate Use: Prepare the batter just before frying to maintain its effervescence, which contributes to the desired crispiness.
- Cheesecake Preparation:
- Uniform Slices: Cut the cheesecake into equal-sized pieces to ensure consistent frying times and presentation.
- Clean Cuts: Wipe the knife clean between cuts to maintain the cheesecake’s appearance and prevent sticking.
- Flavor Enhancements:
- Infused Batter: For an extra layer of flavor, consider adding a pinch of cinnamon or nutmeg to the tempura batter.
- Serving Sauces: Pair the tempura cheesecake with complementary sauces like raspberry coulis, chocolate ganache, or a drizzle of honey to enhance its taste profile.
- Safety Precautions:
- Controlled Frying: Be cautious when frying to prevent oil splatters. Using a deep pan can help contain the oil and reduce the risk of accidents.
- Proper Draining: After frying, place the tempura cheesecake pieces on a wire rack or paper towels to drain excess oil, ensuring a crisp texture.
By incorporating these tips into your preparation process, you’ll elevate your tempura cheesecake, making it a memorable and delectable dessert experience.
Storage Methods
After creating your tempura cheesecake masterpiece, proper storage is key to preserving its unique textures and flavors. Since this dessert features a delicate balance between a crispy tempura coating and a creamy cheesecake center, follow these guidelines to keep it fresh:
- Refrigeration: Once the tempura cheesecake pieces have cooled completely after frying, arrange them in a single layer on a plate or tray lined with parchment paper. Then, transfer the pieces to an airtight container. Store the container in the refrigerator for up to 2 days. This method helps maintain the cheesecake’s cool, creamy interior while preserving as much of the crispiness as possible.
- Preventing Sogginess: To avoid the tempura coating from becoming soggy, consider placing a paper towel at the bottom of your container to absorb any excess moisture. If stacking the pieces, separate them with additional parchment paper to prevent sticking.
- Freezing Option: Although tempura cheesecake is best enjoyed fresh, you can freeze any leftovers. Lay the cooled pieces on a baking sheet in a single layer and freeze until solid. After freezing solid, place the pieces in an airtight container or resealable freezer bag for long-term storage. Keep in mind that the tempura coating may lose some of its crispness after thawing.
- Reheating for Crispiness: When you’re ready to enjoy your stored tempura cheesecake, reheat it to revive the crispy exterior. Preheat your oven to 180°C (350°F) and place the cheesecake pieces on a baking sheet. Warm them for about 3–5 minutes—just enough to restore crunch without overcooking the creamy center.
- Serving After Storage: Let the reheated pieces cool for a minute or two at room temperature before serving. This brief resting period allows the flavors to settle and ensures that you experience the perfect contrast between the crisp tempura shell and the smooth cheesecake filling.
Following these storage methods will help you enjoy your tempura cheesecake at its best, even when prepared ahead of time.
Serving and Presentation
Elevate your tempura cheesecake by focusing on its presentation. Arrange the crispy, golden pieces neatly on a clean, elegant serving plate. Consider these ideas for a standout presentation:
- Garnish Creatively:
Drizzle a light maple syrup or chocolate sauce over the cheesecake pieces. Add a dusting of powdered sugar for a subtle, sweet finish. Fresh berries or a mint leaf not only enhance the flavor but also add a vibrant splash of color. - Create Contrast:
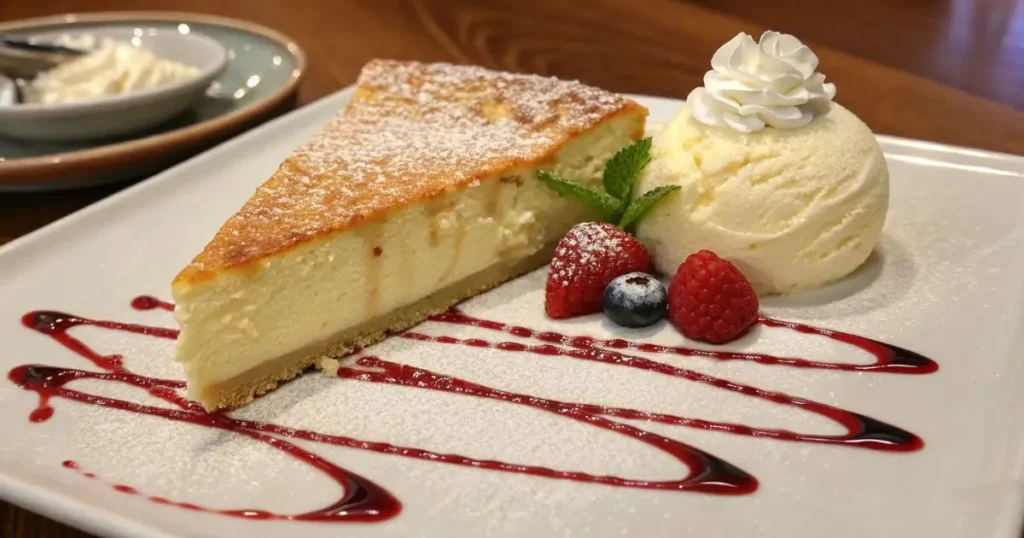
Serve the tempura cheesecake alongside a small scoop of vanilla ice cream or a dollop of whipped cream. The contrast between the warm, crispy exterior and the cool, creamy side elevates the overall dining experience. - Plate with Care:
Keep the serving plate uncluttered so that the dessert remains the star. Use a minimalist style to let the unique textures and flavors shine through. - Offer Personal Touches:
If hosting a gathering, consider placing individual portions on stylish mini-plates. This adds a personal touch and makes each serving feel exclusive.
By paying attention to these details, your tempura cheesecake will not only taste delicious but also look irresistible, leaving a lasting impression on your guests.
Frequently Asked Questions
Can I prepare tempura cheesecake ahead of time?
Yes, you can. Once the cheesecake has set and been fried, you can store it in the refrigerator for up to two days. However, for the best texture, enjoy it fresh. If you need to prepare it in advance, consider freezing individual pieces and reheating them in the oven for a few minutes to restore their crispiness.
What should I do if I don’t have sparkling water?
Sparkling water is essential for a light, airy tempura batter. If you don’t have it, you can substitute it with ice-cold club soda. The key is to keep the liquid as cold as possible to achieve the desired crisp texture.
How do I know when the cheesecake is ready for frying?
The cheesecake should be firm enough to hold its shape during frying. After baking, allow it to cool completely and refrigerate for at least four hours (or overnight). It should feel dense and set when you press it gently with your finger.
Can I use a different type of oil for frying?
Absolutely. Vegetable oil is commonly used due to its high smoke point and neutral flavor, but you can also use canola oil or peanut oil. The important factor is to maintain an oil temperature of around 180°C (350°F) to achieve a perfectly crispy coating.
How can I ensure the tempura coating stays crispy?
Maintaining the oil temperature and not overcrowding the pan are key. Additionally, after frying, drain the pieces on paper towels or a wire rack to remove excess oil. If storing leftovers, a short reheat in the oven can help restore the crispiness.
Is this recipe suitable for beginners?
Yes, the recipe is designed to be straightforward. By following the step-by-step instructions and tips provided, even novice cooks can successfully create a delicious tempura cheesecake with a balance of crisp and creamy textures.
What are some creative serving suggestions?
You can serve tempura cheesecake with a variety of accompaniments. Consider pairing it with a scoop of vanilla ice cream, a drizzle of chocolate or caramel sauce, or a sprinkle of powdered sugar. Fresh berries or a sprig of mint can add a refreshing contrast and elevate the presentation.
Tempura Cheesecake Made Easy: Step-by-Step Recipe
Ingredients
For the Cheesecake Filling:
- 400 g cream cheese softened
- 100 g granulated sugar
- 2 large eggs
- 1 tsp vanilla extract
- 150 ml heavy cream
- 1 tbsp lemon juice
- 1 tbsp all-purpose flour
For the Tempura Batter:
- 100 g all-purpose flour
- 50 g cornstarch
- 1/2 tsp baking powder
- 1/4 tsp salt
- 150 ml ice-cold sparkling water
For Serving and Garnishing (Optional):
- Fresh berries
- Powdered sugar
- Maple syrup or chocolate sauce
Notes
- Calories: 320
- Total Fat: 20g
- Protein: 6g
- Carbohydrates: 28g
- Fiber: 1g
- Sugar: 15g
- Cholesterol: 50mg
- Sodium: 180mg
Conclusion
In conclusion, the tempura cheesecake recipe is a celebration of culinary creativity a delightful fusion that brings together a crispy tempura shell and a luxuriously creamy cheesecake center. This innovative dessert not only excites your palate but also offers a fun, hands-on cooking experience that is both accessible and rewarding.
By following the detailed instructions, using the right ingredients, and applying the practical tips and storage methods provided, you’re well-equipped to create a dessert that’s sure to impress. We encourage you to experiment with this recipe, make it your own, and don’t hesitate to add your unique twist.
If you try this recipe, please share your experience, photos, and feedback with your friends and on social media. Your insights not only help refine the dish further but also inspire others to explore and enjoy the art of fusion cooking.
Happy cooking and happy sharing!
Have you given our recipe a try ?
There are no reviews yet. Be the first one to write one.
Last Updated on June 9, 2025 by Janelle

- Cream Cheese Corn Dip: Easy Recipe Ready in 20 Minutes - January 24, 2026
- Perfect Cheesecake Cookies (Soft, Tangy & Rolled in Graham Crust) - December 27, 2025
- The Ultimate Turkey Cheese Sandwich: Hot Melt and Cold Deli Recipes - December 13, 2025