

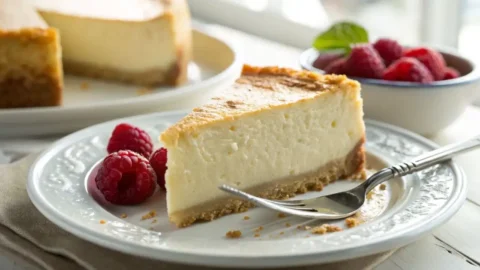
Healthy Cottage Cheese Cheesecake Recipe (High Protein)
There’s a cruel irony embedded in every fitness journey: the harder you work to hit your daily protein macros, the more your body screams for something indulgent, creamy, and devastatingly rich. Traditional cheesecake, glorious as it is, reads like a nutritional horror story. Saturated fat stacked on refined sugar stacked on a butter-bomb crust. You want the reward without derailing the week.
Enter the cottage cheese cheesecake, not a compromise, not a sad substitute, but a genuinely satisfying, macro-friendly indulgence that has taken the fitness community by storm. By pulverizing full-fat cottage cheese curds into a velvet ribbon of silky cream, you unlock a high-protein dessert with a dense, custardy crumb that rivals any New York-style slice. This is your definitive guide, a consolidated master resource covering every technique, variation, and storage strategy for the ultimate healthy cheesecake recipe built around blended cottage cheese.
Table of Contents
Traditional vs. Cottage Cheese: The Macro Breakdown
Before we even preheat the oven, let’s confront the numbers. This table is why fitness enthusiasts are ditching the cream cheese blocks and reaching for the cottage cheese tub every single time.
| Feature | Traditional NY Style | Our High-Protein Version |
| Primary Base | Full-fat cream cheese | 2% or full-fat cottage cheese |
| Protein (per slice) | ~6–8g | ~18–24g |
| Total Fat (per slice) | ~28–35g | ~8–12g |
| Calories (per slice) | ~450–550 kcal | ~180–240 kcal |
| Carbohydrates | ~35–45g (refined sugar) | ~10–16g (natural sweeteners) |
| Texture Profile | Ultra-dense, heavily rich | Custardy, light, satiny |
| Keto-Adaptable? | Difficult (high sugar crust) | Yes (almond flour + monk fruit) |
This is not a minor tweak; it’s a complete nutritional transformation. Swapping the base alone slashes fat by roughly 70% while tripling your protein return. For anyone tracking macros, this cottage cheese cheesecake operates more like a post-workout recovery tool than a dessert.
The Secret to a Lump-Free Batter
Here is where most home bakers sabotage their cottage cheese cheesecake before it ever touches the oven: they skip the full liquefaction step.
Cottage cheese is structurally unique. Those small, granular curds are suspended in a watery whey matrix. If you fold them directly into your batter, you’ll bake a grainy, separated, texturally offensive result. The science is simple: the curds must be completely broken down at the molecular level before any other ingredient joins them.
This requires a high-speed food processor or a professional-grade blender, not a handheld mixer, not a fork. Run the cottage cheese alone on the highest setting for a full 60–90 seconds until the batter cascades off a spoon in a seamless, glossy flow, no white specks, no resistance, no hesitation. You’re not stirring; you’re engineering an emulsion.
Room temperature ingredients are non-negotiable. Cold eggs shock the fats in your batter, causing micro-separation before the bake even begins. Cold cottage cheese also resists full liquefaction. Pull your eggs, sweetener, and lemon juice from the refrigerator at least 45 minutes before you begin. This single discipline separates a cracked, uneven cheesecake from one with a perfectly flat, porcelain-smooth surface.
The Grocery List (What You Need)
The Base
- Full-fat or 2% cottage cheese (24 oz / ~680g). This is your entire structural foundation. Fat-free cottage cheese becomes rubbery and grainy under heat; the residual fat content in 2% or full-fat varieties is what coaxes that luxurious, custardy interior. Choose a small-curd variety for faster liquefaction.
The Binder
- 3 large eggs, room temperature: Eggs are the custard architects here. Their proteins denature slowly under gentle heat, weaving a soft, sliceable structure without the filling becoming a scrambled, sulfurous mess. Do not skip or reduce.
- 2 tablespoons cornstarch OR 1 scoop (30g) unflavored whey protein powder: Cornstarch absorbs excess moisture from the cottage cheese during baking, tightening the crumb. Whey protein powder amplifies the protein content further and adds a subtle density to the final slice.
The Sweetener
- ¼ cup (60ml) pure maple syrup or raw honey: for a natural, wholesome sweetness with a faint caramel undertone.
- Or 3–4 tablespoons monk fruit sweetener: for a fully keto-compliant, zero-glycemic alternative that dissolves beautifully into the liquefied batter.
The Flavor
- 1½ teaspoons pure vanilla extract: not artificial; the real thing carries a floral complexity that rounds out the tangy dairy base.
- 1 tablespoon fresh lemon juice + ½ teaspoon lemon zest: This is your flavor activator. The acid brightens every other ingredient and replicates the signature tang of a classic cheesecake without a drop of sour cream.
The Crust
- Almond flour crust (low-carb/keto): Combine 1½ cups almond flour, 3 tablespoons melted coconut oil, and 1 tablespoon monk fruit sweetener. Press into a 9-inch springform pan and pre-bake at 350°F for 8 minutes.
- Classic graham cracker crust: Crush 10 full graham cracker sheets into fine crumbs, bind with 4 tablespoons melted butter and 2 tablespoons sugar, then press and pre-bake for 6–8 minutes.
Step-by-Step Baking Instructions
Step 1: The Silky Purée
- Add the entire 24 oz of cottage cheese to your food processor bowl, nothing else yet. Seal it and run it at maximum speed for 90 seconds. Scrape the walls. Run for another 30 seconds. The mixture should now pour like a thin pancake batter with an almost reflective sheen.
- Now add your room-temperature eggs one at a time through the feed tube while the processor runs on medium speed. This gradual incorporation prevents the eggs from tightening the emulsion prematurely. Follow with the sweetener, vanilla, lemon juice, zest, and cornstarch or protein powder. Process for a final 20 seconds until everything is unified into one aggressively smooth, aromatic cream. Resist the urge to over-process at this stage; excessive air incorporation at high speed leads to cracking during the bake.
Step 2: The Gentle Bake
- Preheat your oven to 325°F (163°C). This is a low-and-slow affair by design. High-heat baking, anything above 350°F, will cause the eggs to cook too aggressively, resulting in a rubbery, sulfurous texture and a crater-like cracked surface.
- Pour the liquefied batter over your pre-baked crust in the springform pan. Tap the pan gently on the counter three times to release any trapped air pockets near the surface. Bake on the center rack for 45–55 minutes. The edges should be set and faintly pulling away from the pan wall, while the very center, a circle about the size of a golf ball, still carries a slow, liquid wobble. This is perfect. Carryover heat will finish the center during the cooling phase.
- Turn off the oven. Crack the oven door open by 2–3 inches and allow the cheesecake to rest inside the cooling oven for 30 minutes. This gradual temperature descent prevents the thermal shock that causes dramatic surface cracks.
Step 3: The Patience Game (Chilling)
This is the most critical step, and the one most people violate out of impatience.
- Cottage cheese is rich in casein protein, a slow-digesting, fibrous protein that requires sustained cold temperatures to fully cross-link and set into a firm, sliceable structure. A cheesecake that goes from warm oven to refrigerator to plate within a few hours will be soft, soupy, and will collapse the moment you attempt a clean cut.
- Transfer the cheesecake to the refrigerator, still in its springform pan, still uncovered for the first 30 minutes, and let it rest for a minimum of 8 hours, ideally overnight. The proteins will fully solidify, the moisture will redistribute evenly throughout the crumb, and the flavor will deepen and meld into something far more complex than it tasted warm. Patience is the final, invisible ingredient in every exceptional cheesecake.
Three Guilt-Free Flavor Variations

1. The Lemon Blueberry Swirl
Prepare the base batter as instructed. In a small saucepan, warm ½ cup fresh or frozen blueberries with 1 teaspoon maple syrup and a squeeze of lemon over medium heat until the berries burst into a thick, jewel-toned compote, roughly 5 minutes. Pour the cottage cheese batter into the crust. Drop spoonfuls of the blueberry compote across the surface, then drag a toothpick through in a lazy figure-eight pattern to create a dramatic violet-and-cream marbled canvas. Bake as directed. The lemon already embedded in the base plays brilliantly against the tartness of the blueberry; this is the variation for those who want the dessert to feel as alive as it looks.
2. The Double Chocolate Protein Slice
Replace the cornstarch with 1 scoop (30g) of chocolate whey protein powder. Add 2 tablespoons of Dutch-process cocoa powder and 2 oz of 85% dark chocolate, melted and cooled, directly into the food processor with the base batter. Sweeten with monk fruit to keep it keto-aligned. The result is a dense, fudge-adjacent interior with a richly bitter chocolate character, somewhere between a protein brownie and a New York cheesecake. Finish each slice with a light dusting of cocoa powder and a single cacao nib for textural contrast.
3. The Salted Caramel Pecan
Prepare the almond flour crust and press ¼ cup of roughly chopped toasted pecans directly into the crust layer before pre-baking. Add 1 teaspoon of cinnamon and a pinch of smoked sea salt to the base batter. Once the cheesecake has fully chilled, drizzle the surface with 2 tablespoons of sugar-free salted caramel sauce (or a traditional version for non-keto) and scatter a handful of additional toasted pecan halves across the top. The interplay of smoky salt, warm cinnamon, and caramel against the clean dairy tang of the cottage cheese base is a revelation, a dessert that tastes dangerously like a pecan pie crossbred with a cheesecake.
Meal Prep and Storage Rules
One of the quiet superpowers of this high-protein dessert is how gracefully it accommodates a meal-prep lifestyle.
- Refrigerator storage: Once fully set, cover the springform pan tightly with plastic wrap or transfer individual slices to airtight glass containers. The cheesecake holds beautifully in the fridge for up to 5 days without any degradation in texture or flavor. In fact, Day 3 is often the peak, as the flavors have had additional time to settle.
- Can you freeze it? Absolutely, and this is where the meal-prep magic truly activates. Slice the fully chilled cheesecake into individual portions. Place each slice on a parchment-lined sheet tray and freeze uncovered for 1 hour (this “flash freeze” prevents the slices from fusing together). Once solid, transfer to a zip-top freezer bag or an airtight container. Individual slices will keep in the freezer for up to 3 months and serve as ready-to-deploy, post-workout treats. Thaw a slice overnight in the refrigerator, or let it sit at room temperature for 20–25 minutes. The texture rebounds remarkably well, still dense, still custardy, still satisfying.
- Avoid microwaving from frozen; rapid reheating breaks the egg-protein structure and produces a grainy, weeping texture. Low and slow applies to the thaw as much as it does to the bake.
Healthy Cottage Cheese Cheesecake (High Protein)
Ingredients
Base
- 24 oz full-fat or 2% cottage cheese small-curd variety preferred
Binder
- 3 large eggs room temperature
- 2 tbsp cornstarch or 1 scoop (30g) unflavored whey protein powder
Sweetener
- 0.25 cup pure maple syrup or raw honey or 3–4 tbsp monk fruit sweetener for keto
Flavor
- 1.5 tsp pure vanilla extract
- 1 tbsp fresh lemon juice plus 1/2 tsp lemon zest
Almond Flour Crust (Low-Carb/Keto)
- 1.5 cup almond flour
- 3 tbsp melted coconut oil
- 1 tbsp monk fruit sweetener
Classic Graham Cracker Crust (Optional)
- 10 sheets graham crackers crushed into fine crumbs
- 4 tbsp melted butter
- 2 tbsp sugar
Notes
Frequently Asked Questions
Does it actually taste like cottage cheese?
No, and this is the question that stops most skeptics in their tracks. The baking process fundamentally neutralizes the mild, slightly acidic flavor characteristic of raw cottage cheese. Once the curds have been liquefied and subjected to sustained heat, the dairy flavor profile shifts entirely. What you taste in the finished cheesecake is a clean, neutral creaminess that reads as rich dairy, indistinguishable, in blind taste tests, from a cream-cheese-based filling. The lemon juice and vanilla do the rest of the work, anchoring the flavor in familiar cheesecake territory.
Why did my cheesecake crack?
Two culprits, almost every time. First: cooling too rapidly. Removing the cheesecake from the oven and placing it directly on a cold counter (or worse, into the refrigerator while still hot) causes violent thermal contraction on the surface while the interior is still warm and expanding. Always use the gradual oven-door cooling method described above. Second: over-incorporating air into the eggs. If you beat the eggs aggressively before or during mixing, air bubbles form in the batter. These bubbles expand dramatically in the oven and then collapse upon cooling, dragging the surface down with them. Add eggs gently, one at a time, and process only until incorporated, not a moment longer.
Can I make this no-bake?
You can, though the baked version delivers a significantly superior texture, a true custardy, sliceable crumb that no refrigerator alone can replicate. For a no-bake cottage cheese cheesecake, liquefy the cottage cheese as instructed, then bloom 1 tablespoon of unflavored gelatin in 3 tablespoons of cold water, melt it gently, and fold it into the batter. Pour over your crust and refrigerate for a minimum of 6 hours. The gelatin sets the proteins in a way that mimics, but does not fully recreate, the structural complexity that baking achieves. If time is your constraint, the no-bake version is a respectable fallback. But if you have a spare evening and 8 hours of refrigerator time, always bake.
Have you given our recipe a try ?
There are no reviews yet. Be the first one to write one.
Last Updated on March 24, 2026 by Janelle

- Copycat Cracker Barrel Mac and Cheese Recipe - March 27, 2026
- Cream Cheese Corn Recipe (Stovetop & Baked Casserole) - March 21, 2026
- Easy Sweet Cream Cheese Filling (For Crepes, Pastries & Fruit) - March 11, 2026