

Crispy Baked Mac and Cheese Bites (The Muffin Tin Method)
There is a universal culinary truth: shrinking heavy comfort food into handheld, portable portions makes it completely irresistible.
While a massive, bubbling casserole dish of macaroni and cheese is the undisputed king of comfort dinners, it isn’t exactly portable. If you are hosting a holiday cocktail party, packing a school lunchbox, or setting up a game-day appetizer spread, serving gooey pasta off a spoon simply doesn’t work.
Enter Baked Mac and Cheese Bites (also known as macaroni and cheese cups).
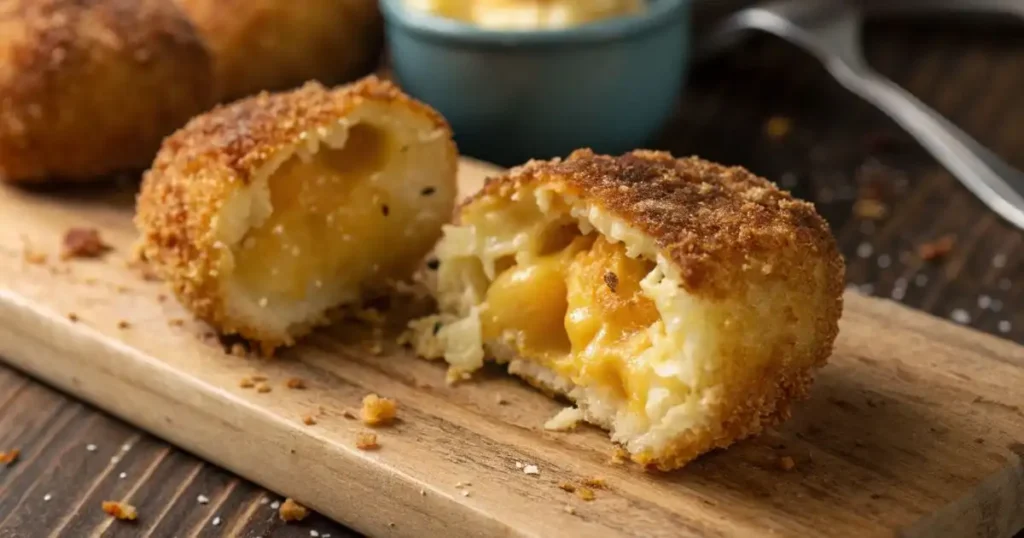
Baking transforms the traditional dish into something altogether different: a crispy, Panko-crowned shell wrapped around a molten, creamy center. This master guide will teach you the exact culinary physics needed to ensure your macaroni cups hold their shape without falling apart, along with high-end flavor variations that will make them the most requested item at your next party.
Table of Contents
The Culinary Physics of the “Binder” (Why They Don’t Fall Apart)
If you attempt to scoop standard stovetop macaroni into a baking tin, it will immediately collapse into a messy puddle the second you try to pick it up. A standard cheese sauce is a fluid emulsion; it possesses no structural integrity on its own.
The secret to a freestanding mac and cheese cup is the tempered egg binder.
By whisking a large egg and gently folding it into the chilled pasta mixture before baking, you introduce a web of responsive proteins. As the cups are subjected to oven heat, those egg proteins coagulate, binding the pasta and dairy together into a firm, sliceable architecture. You won’t taste the egg at all; it simply acts as the invisible glue that allows you to pick the bite up with your fingers.
The Appetizer Matrix: Baked vs. Deep-Fried
When restaurants put Mac and Cheese Bites on the menu, they usually plunge them into a deep fryer. For home cooks, utilizing a muffin tin is significantly more efficient and far less messy. Here is the breakdown:
| Technique | Texture Profile | Structural Integrity | Kitchen Mess Level |
|---|---|---|---|
| The Muffin Tin Bake | Crispy top canopy, firm edges, soft and gooey center. | Excellent (if allowed to cool and set properly in the tin). | Very Low (One pot and one baking tin). |
| The Deep Fry | Heavy, uniform crunch on all sides with a melted core. | Good, but prone to exploding in the hot oil if not frozen first. | High (Requires managing hot oil and a breading station). |
*This guide focuses entirely on the Muffin Tin method, delivering maximum flavor with minimal kitchen cleanup.*
The Architectural Blueprints (Ingredients)
To build the perfect bite, gather these components:
2 cups (200g) tubular macaroni: Small pasta shapes are mandatory here, so they pack tightly into the muffin matrix.
The Structural Binder: 2 large eggs, lightly beaten.
The Emulsion Base: 2 tablespoons unsalted butter, 2 tablespoons all-purpose flour, and 1½ cups warm whole milk.
The Dual-Flavor Cheese Profile: 1 cup freshly grated sharp cheddar (for traditional flavor) and ½ cup freshly grated Gruyère (for a nutty, superior melt). *Do not use pre-shredded bagged cheese; the anti-caking coating prevents cohesion.*
The Shattering Crust: 1 cup Panko breadcrumbs tossed with 2 tablespoons melted butter and ¼ cup Parmesan.
The Aromatics: ½ tsp garlic powder, ½ tsp dry mustard powder, 1 tsp smoked paprika (for the topping), salt, and black pepper.
Step-by-Step Assembly (The Muffin Tin Technique)
Phase 1: The Pasta Hydration
Submerge your tubular macaroni in a rolling, heavily saline bath. Hydrate the pasta until it is just *shy* of al dente, roughly one minute less than the package directs. The pasta must remain slightly undercooked as it will continue to absorb moisture during the oven phase. Drain thoroughly.
Phase 2: The Béchamel Emulsion
Initiate the sauce by forging a golden, bubbling roux in a heavy-bottomed vessel. Melt the butter, whisk in the flour, and cook for 2 minutes until it smells faintly of toasted nuts. Gradually stream in the warm milk, whisking continuously to prevent lumps, until the liquid thickens enough to coat the back of a spoon.
Remove the vessel from the heat completely. Fold in the grated cheddar and Gruyère until you achieve a glossy, molten emulsion. Season with garlic powder, dry mustard, salt, and pepper. Fold the hydrated pasta into the cheese sauce.
Phase 3: The Chill and the Binder
*Do not skip this step.* Transfer the macaroni mixture to a wide dish and refrigerate for 45 to 60 minutes. Working with a chilled mixture is the only way to form perfect cups. Once cold, gently fold in the beaten eggs until the entire mixture is coated.
Phase 4: The Packing and Crisping
Subject your oven to a 400°F (200°C) preheat. Create a non-stick barrier in your 12-cup baking matrix by aggressively lubricating it with melted butter or cooking spray (coat the walls and the bottom).
Press a teaspoon of the Panko topping into the bottom of each cup. Pack 2 to 3 tablespoons of the chilled mac and cheese mixture tightly into each cavity. Crown each cup with a heavy dusting of the remaining buttered Panko, pressing down gently so it adheres. Bake for 18 to 22 minutes until the canopy is deep golden brown.
Phase 5: The Crucial Cooling Window
If you attempt to extract the bites while they are boiling hot, they will disintegrate. You must allow them to rest in the tin for a minimum of 5 to 8 minutes. This thermodynamic rest period allows the egg proteins to finalize their structure. Run a butter knife around the perimeter of each cup, and they will pop out flawlessly.
High-End Flavor Customizations
Once you master the base architecture, you can engineer these brilliant variations:
- 1. The Truffle & Wild Mushroom Cup: Stir ¼ cup of finely minced, sautéed cremini mushrooms and a few drops of high-quality white truffle oil into the chilled pasta before baking.
- 2. The Smoky veal & Jalapeño Bite: Fold in ½ cup of rendered, crumbled veal and 2 tablespoons of finely diced pickled jalapeños for a sweet-and-smoky contrast.
- 3. Buffalo Chicken Mac Bites: Fold ½ cup of finely shredded rotisserie chicken (tossed in buffalo hot sauce) into the mixture. Crumble blue cheese into the Panko topping for an aggressive flavor punch.
Preservation and Reheating Protocols
Refrigerator Storage: Store cooled bites in an airtight container for up to 3 days.
Freezing Instructions: Baked and cooled bites freeze beautifully. Arrange them in a single layer on a baking sheet, freeze until solid (about 1 hour), then transfer to a zip-top bag. They will keep for up to 2 months.
Reheating Methods: Skip the microwave entirely; it will destroy the Panko crust and turn the pasta rubbery. Instead, place the bites on a wire rack set over a baking sheet in a 375°F (190°C) oven for 8–10 minutes. (If reheating from frozen, add an extra 5 minutes). They will crisp right back up to their original glory.
Crispy Baked Mac and Cheese Bites (The Muffin Tin Method)
Ingredients
Macaroni
- 2 cups tubular macaroni small pasta shapes for tight packing
Binder
- 2 large eggs lightly beaten
Béchamel Sauce
- 2 tablespoons unsalted butter
- 2 tablespoons all-purpose flour
- 1.5 cups whole milk warm
Cheese
- 1 cup sharp cheddar freshly grated
- 0.5 cup Gruyère cheese freshly grated
Topping
- 1 cup Panko breadcrumbs
- 2 tablespoons unsalted butter melted, for Panko topping
- 0.25 cup Parmesan cheese grated
Seasonings
- 0.5 teaspoon garlic powder
- 0.5 teaspoon dry mustard powder
- 1 teaspoon smoked paprika for topping
- to taste salt
- to taste black pepper
Notes
Frequently Asked Questions
Can I use a box of store-bought mac and cheese for this?
Technically, yes, but it requires heavy modification. Boxed mac and cheese (the powdered kind) lacks the heavy dairy fat and real cheese proteins needed to solidify the cups. If you use a boxed mix, you *must* add the whisked egg binder and a generous handful of real shredded cheese to the pot before baking, or they will collapse upon extraction.
Why did my mac and cheese bites stick to the muffin tin?
Cheese acts like industrial glue when it cools against bare metal. You must aggressively grease the muffin tin. For extra insurance, the initial layer of breadcrumbs on the bottom of the cup creates a physical barrier between the cheese and the tin, virtually eliminating sticking.
Have you given our recipe a try ?
There are no reviews yet. Be the first one to write one.
Last Updated on March 30, 2026 by Janelle

- Crispy Baked Mac and Cheese Bites (The Muffin Tin Method) - March 30, 2026
- Copycat Cracker Barrel Mac and Cheese Recipe - March 27, 2026
- Cream Cheese Corn Recipe (Stovetop & Baked Casserole) - March 21, 2026