
15-Minute Chocolate Cheesecake Mousse (Easy & No-Bake)
This is your go-to guide for a rich, creamy, and absolutely effortless dessert. In just 15 minutes, you’ll have a chocolate cheesecake mousse that tastes like it came from a bakery, no oven, no fancy tools, no stress.
You’ll also find troubleshooting tips to help you fix any texture issues, plus variations to make it dairy-free, vegan, or firm enough to use as a pie filling.
Whether you’re hosting guests or treating yourself, this mousse delivers a velvety finish every time — light, fluffy, and full of deep chocolate flavor.
Table of Contents
Table of Contents
Why You’ll Love This Recipe
Decadent: Every bite is rich and creamy, with the flavor of chocolate cheesecake in a light, airy mousse.
No-Bake: Skip the oven and keep things simple. This dessert comes together fast with zero baking required.
Effortless: You only need a few ingredients and 15 minutes of prep for a dessert that looks and tastes restaurant-quality.
This recipe is all about balance, simple steps, quick results, and a texture that feels silky and indulgent. It’s the kind of dessert that impresses without stress.
Ingredients Needed
For the base chocolate cheesecake mousse:
- 8 oz cream cheese (softened)
- 1 cup heavy cream
- 1 cup semi-sweet chocolate chips (melted and slightly cooled)
- ¼ cup powdered sugar
- 1 tsp vanilla extract
- Pinch of salt
Step-by-Step Instructions
1. Gather and Prepare Ingredients
- Lay out all components, allowing them to reach room temperature to ensure seamless mixing.
- You’ll need Semi-sweet chocolate chips, softened cream cheese, heavy whipping cream, Powdered sugar, and a touch of vanilla extract.
2. Melt the Chocolate
- Finely chop the chocolate into even pieces and transfer them to a microwave-safe bowl.
- Heat in short intervals, stirring between each, until the chocolate is fully melted and smooth.
- Tip: Be cautious not to overheat; gentle melting preserves the chocolate’s glossy finish.
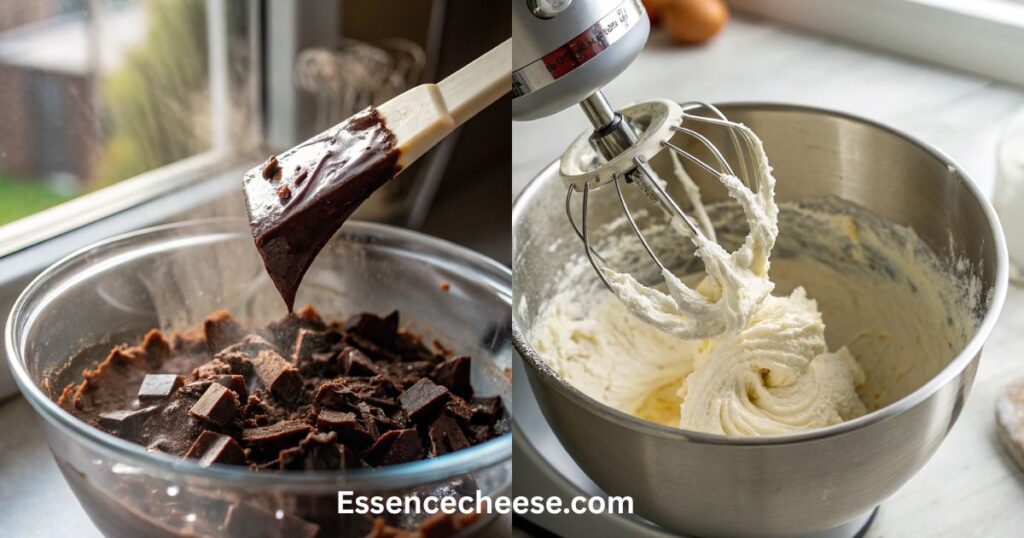
3. Blend the Cream Cheese Mixture
- In a mixing bowl, combine the softened cream cheese with powdered sugar and vanilla extract.
- Beat until the mixture is creamy and free of lumps, which should take about 2–3 minutes on medium speed.
4. Whip the Cream
- In a separate chilled bowl, pour in the heavy whipping cream.
- Whisk until soft peaks form, indicating the cream has reached the desired lightness.
5. Combine All Components
- Gently incorporate the melted chocolate into the cream cheese mixture, stirring until well blended.
- Next, fold in the whipped cream using a spatula, employing gentle motions to maintain the mousse’s airy texture.
- Actionable Insight: Patience is key here; gentle folding ensures a light and fluffy mousse.

6. Assemble and Chill
- Distribute the mousse evenly into individual serving dishes or a single large bowl.
- Smooth the surface, cover, and refrigerate for at least 3 hours, or overnight, to allow the mousse to set properly.
- Pro Tip: Chilling not only firms up the mousse but also enhances the melding of flavors, resulting in a more harmonious taste.
The Secret to Silky Smooth Mousse: A Troubleshooting Guide
Even the best no-bake recipes can go off track. Here’s how to fix common issues and get that flawless, creamy texture every time.
Problem: My Mousse Is Lumpy or Gritty
Solution: The cream cheese was likely too cold, or the melted chocolate cooled too much and seized.
Fix it:
- Always let your cream cheese soften at room temperature before mixing.
- Melt the chocolate gently and stir until smooth before adding it.
- If lumps form, press the mixture through a fine mesh sieve or blend it briefly until smooth.
Problem: My Mousse Is Runny and Won’t Set
Solution: The heavy cream probably wasn’t whipped enough before folding in.
Fix it:
- Whip the cream to stiff peaks — when you lift the whisk, it should hold a firm point.
- If it’s too soft, chill the mixture briefly and whip again.
- Next time, make sure your bowl and beaters are cold for faster whipping.
Problem: My Mousse Tastes Grainy
Solution: The chocolate may have overheated, or the sugar didn’t fully dissolve.
Fix it:
- Melt chocolate slowly using short bursts in the microwave or a double boiler.
- Use powdered sugar instead of granulated sugar for a smoother texture.
Problem: My Mousse Firmed Up Too Much
Solution: It may have been over-chilled or overmixed.
Fix it:
- Let it sit at room temperature for 10–15 minutes before serving.
- Next time, fold the whipped cream gently instead of stirring.
Variations and Substitutions
For a Firmer, Sliceable Mousse
If you’d like a mousse that sets firm enough to slice (perfect for mousse pies or layered desserts), you can stabilize it using gelatin.
- Sprinkle 1 tsp powdered gelatin over 1 tbsp cold water and let it bloom for 5 minutes.
- Warm gently until the gelatin fully dissolves.
- Stir the dissolved gelatin into the cream cheese mixture at the same time as the melted chocolate.
- Fold in the whipped cream, then chill for at least 4 hours or until set.
Optional Richer Texture
For a deeper, custard-like flavor, you can add 2 egg yolks to the melted chocolate before combining. Make sure the chocolate isn’t hot, so the yolks don’t cook.

Storage and Freezing Tips
Proper storage is key to maintaining the luscious texture and rich flavor of your Chocolate Cheesecake Mousse. Let’s explore the best practices for refrigerating and freezing this delightful dessert.
Refrigeration:
- Short-Term Storage: Place your mousse into individual serving dishes or an airtight container. Cover each serving with plastic wrap, ensuring the wrap touches the surface to prevent a skin from forming.
- Shelf Life: When stored correctly, the mousse remains fresh for up to 5 days in the refrigerator. However, for optimal taste and texture, it’s best enjoyed within the first 2 days.
Freezing:
- Preparation: Transfer the mousse into airtight containers, leaving a small space at the top to allow for expansion during freezing. For convenience, consider portioning the mousse into individual servings.
- Storage Duration: Frozen mousse can be stored for up to 3 months without significant loss of quality.
- Thawing: When you’re ready to enjoy the mousse, transfer it to the refrigerator and let it thaw overnight. Once thawed, gently fold the mixture to restore its airy consistency before serving.
Additional Tips:
- Avoid Frequent Temperature Changes: To maintain the mousse’s integrity, minimize the number of times it’s moved between different temperatures.
- Quality Check: Before serving, especially after storage, give the mousse a quick taste to ensure it has retained its delightful flavor and texture.
Serving Suggestions
Serving your Chocolate Cheesecake Mousse can be as delightful as preparing it. Let’s explore some creative and delectable ways to present this dessert that will impress your guests and elevate your dining experience.
1. Elegant Individual Portions:
- Glassware Presentation: Spoon the mousse into clear glassware, such as wine glasses, martini glasses, or small mason jars. The transparent sides showcase the mousse’s rich texture and any layered elements, adding a touch of sophistication.
- Layering: Create visual interest by alternating layers of mousse with crushed cookies, graham crackers, or fruit compote. This not only enhances the appearance but also adds delightful textural contrasts.
2. Garnishing Ideas:
- Fresh Berries: Top the mousse with a handful of fresh raspberries, strawberries, or blueberries. The tartness of the berries complements the rich chocolate flavor, providing a refreshing balance.
- Chocolate Accents: Enhance the chocolate experience by adding chocolate shavings, curls, or a drizzle of chocolate ganache over the top. For a contrasting flavor, consider white chocolate shavings.
- Whipped Cream: A dollop of freshly whipped cream adds lightness to the dense mousse. For an extra touch, sprinkle a pinch of cocoa powder or cinnamon on top.
3. Accompaniments:
- Crunchy Elements: Serve the mousse alongside crisp biscotti, delicate tuiles, or almond cookies. The crunchiness pairs well with the creamy texture of the mousse.
- Fruit Compote: A side of warm berry compote or citrus sauce can provide a tangy contrast, elevating the overall flavor profile.
4. Themed Presentations:
- Seasonal Touches: Incorporate seasonal fruits or edible flowers to align the dessert with the time of year, adding freshness and color.
- Holiday Variations: For festive occasions, consider adding flavors like peppermint or cinnamon to the mousse and garnishing with themed decorations, such as crushed candy canes or spiced nuts.
5. Serving Temperature:
- Chilled Delight: Ensure the mousse is well-chilled before serving to maintain its structure and enhance its refreshing qualities.
- Room Temperature: If preferred, allow the mousse to sit at room temperature for about 10-15 minutes before serving to soften slightly, intensifying the flavors.
You can even serve this chocolate cheesecake mousse fondue-style for a fun, interactive dessert experience.
15-Minute Chocolate Cheesecake Mousse (Easy & No-Bake)
Ingredients
Base Chocolate Cheesecake Mousse
- 8 oz cream cheese softened
- 1 cup heavy cream
- 1 cup semi-sweet chocolate chips melted and slightly cooled
- 1/4 cup powdered sugar
- 1 tsp vanilla extract
- 1 pinch salt
Instructions
- Step 1: Gather and Prepare Ingredients
Lay out all ingredients and allow them to reach room temperature to ensure smooth mixing. - Step 2: Melt the Chocolate
Finely chop the chocolate and melt it in a microwave-safe bowl in short intervals, stirring between each. Avoid overheating to maintain its smooth texture. - Step 3: Blend the Cream Cheese MixtureIn a bowl, beat softened cream cheese with powdered powdered sugar and vanilla extract until smooth and creamy, about 2–3 minutes on medium speed.
- Step 4: Whip the Cream
In a separate chilled bowl, whip the heavy cream until soft peaks form. - Step 5: Combine All Components
Gently fold the melted chocolate into the cream cheese mixture until smooth. Then, fold in the whipped cream using a spatula, being careful not to deflate the mixture. - Step 6: Assemble and Chill
Spoon the mousse into serving glasses or bowls, smooth the tops, and refrigerate for at least 3 hours to set. Serve chilled.
Notes
- Note 1: For the smoothest texture, ensure your cream cheese is fully softened to room temperature.
- Note 2: Use a chilled bowl and beaters to help the heavy cream whip up faster and hold its shape.
Related Recipes You Might Love
Conclusion
Congratulations on crafting your own Chocolate Cheesecake Mousse! This dessert is a testament to how simple ingredients can come together to create something truly indulgent. Whether you’ve followed the classic recipe or added your personal touch with variations, you’ve made a treat that’s sure to delight.
Remember, the beauty of this mousse lies in its versatility. Feel free to experiment with different flavors and presentations in future batches. And don’t forget to share your creations with friends and family—they’ll surely appreciate the effort and love you’ve put into making this dessert.
Frequently Asked Questions
Q1: What is the difference between chocolate cheesecake mousse and regular chocolate mousse?
A: Chocolate cheesecake mousse combines the tangy creaminess of cheesecake with the light, airy texture of chocolate mousse. Regular chocolate mousse is typically lighter and made without cream cheese, while cheesecake mousse offers a denser, richer taste.
Q2: Can I use this chocolate cheesecake mousse as a filling for a cake or pie?
A: Absolutely. This mousse has enough structure to be used as a cake or tart filling. Just make sure to chill it well before assembling your dessert to ensure it holds its shape.
Q3: Is this mousse cheesecake recipe gluten-free?
A: Yes, the base mousse recipe is naturally gluten-free. Just ensure that any additional elements like cookie crumbles or garnishes are gluten-free if needed.
Q4: What if I accidentally searched for chocolate moose cheesecake, is it the same thing?
A: “Chocolate moose cheesecake” is just a spelling mistake for chocolate mousse cheesecake. The recipe is the same: rich chocolate combined with creamy cheesecake, no moose involved!
Q5: How do I make this cheesecake chocolate mousse firmer for slicing?
A: To make the mousse sliceable, add a small amount of gelatin or agar-agar when mixing. Chill thoroughly to help it set properly before slicing.
Have you given our recipe a try ?
There are no reviews yet. Be the first one to write one.
Last Updated on November 12, 2025 by Janelle

- What to Serve with Mac & Cheese: 35+ Best Side Dishes - March 26, 2026
- Bagels and Cream Cheese: The Ultimate Breakfast Guide (Calories, Flavors & Toppings) - March 14, 2026
- The Ultimate Guide to Viral Cottage Cheese Flatbread - February 14, 2026