
How to Make a Cheesecake Platter (Easy & Impressive!)
Introduction
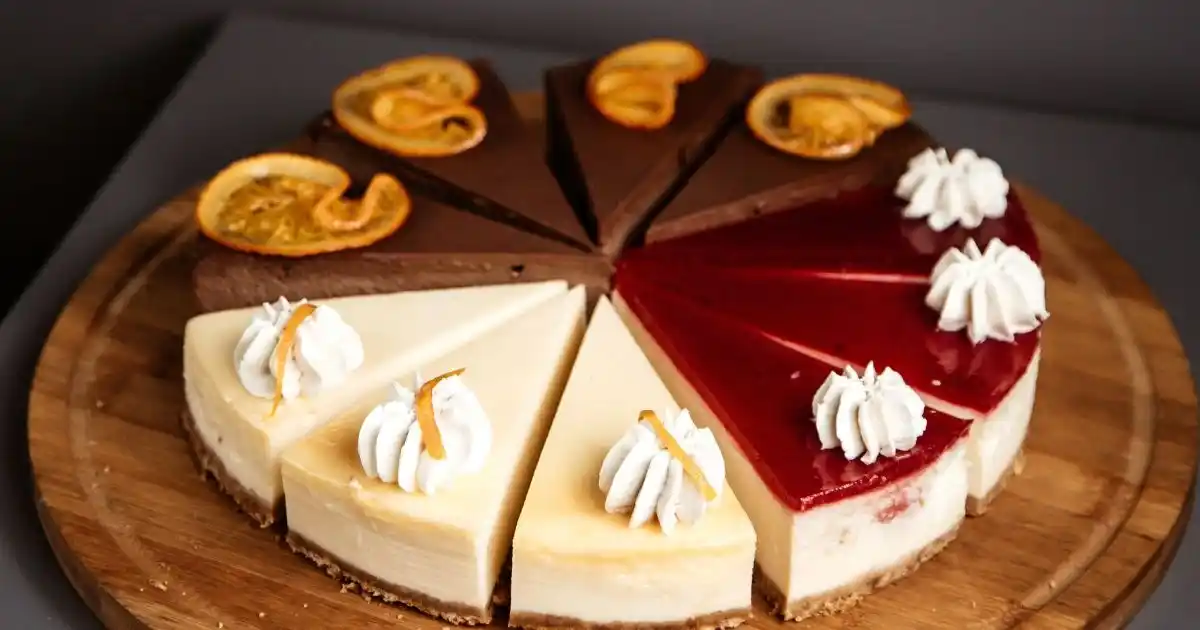
A cheesecake platter is the ultimate dessert centerpiece that turns any gathering into something special. Imagine a board filled with creamy cheesecake bites, fresh fruit, cookies, nuts, and sweet sauces—beautiful to look at and even better to enjoy. Guests love the variety and the chance to mix and match flavors, making it both interactive and fun. Whether you’re hosting a family holiday, a casual brunch, or a dinner party with friends, a cheesecake platter is simple to prepare yet impressive enough to have everyone reaching for seconds.
Table of Contents
Why You’ll Love This Cheesecake Platter:
Impressive with Minimal Effort
The most stunning aspect of a cheesecake platter is how it transforms simple ingredients into a visually spectacular centerpiece. Imagine guests’ eyes widening as they approach your table to find an artfully arranged display of creamy cheesecake bites surrounded by vibrant berries, caramel drizzles, and chocolate shavings. Despite its show-stopping appearance, the assembly requires no special culinary skills—just your creative eye and a few minutes to arrange. This impressive-to-effort ratio makes it perfect for both novice hosts and seasoned entertainers alike.
Budget-Friendly Customization
Creating a cheesecake platter at home is significantly more economical than purchasing individual desserts for a crowd. One standard cheesecake can be transformed into dozens of bite-sized portions, stretching your dessert budget considerably. You can use seasonal fruits to keep costs down and incorporate pantry staples like honey, jam, or chocolate chips as accompaniments. For larger gatherings, combine homemade and store-bought cheesecake to create an abundant display without breaking the bank. This budget-conscious approach doesn’t sacrifice quality or presentation—in fact, the variety actually enhances the experience!
Interactive Dessert Experience
Unlike traditional dessert service, a cheesecake platter creates a social, interactive experience that guests absolutely love. The customizable nature means everyone can create their perfect bite—whether they prefer tart berries with vanilla cheesecake or chocolate chunks with caramel drizzle. This format encourages mingling and conversation as guests gather around the display, sharing recommendations for favorite combinations. Much like our popular dessert grazing tables, the cheesecake platter transforms dessert time from a seated affair into a dynamic, memorable experience that keeps the party energy flowing right through to the sweet finish.
How to Make a Cheesecake Platter
Quick Overview
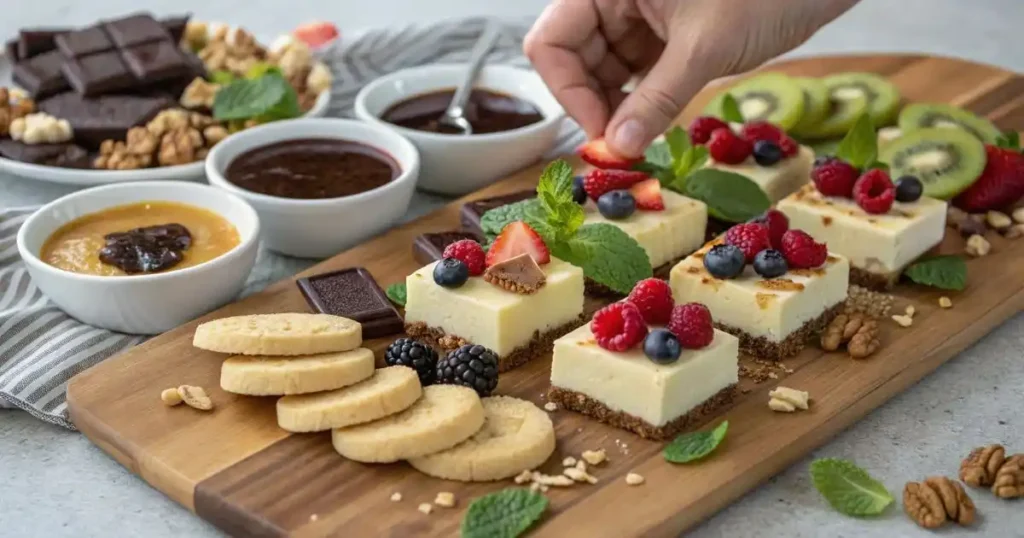
Creating a cheesecake platter is simple, fun, and guaranteed to impress. The key is balancing creamy cheesecake bites with colorful fruits, crunchy toppings, and sweet drizzles. Below is a quick starting combination, followed by plenty of ways to customize your board for any event or season.
Our Favorite Cheesecake Platter Combination (A Great Place to Start)
This version uses easy-to-find ingredients and delivers a balanced mix of flavors and textures that everyone loves.
You’ll Need:
- 1 (9-inch) plain cheesecake (store-bought or homemade)
- 1 cup graham crackers
- 1 cup shortbread cookies
- 1 cup strawberries, halved
- 1 cup blueberries
- ½ cup chocolate chips (milk or dark)
- ½ cup chopped nuts (walnuts or pecans)
- ½ cup chocolate sauce
- ½ cup caramel sauce
- Fresh mint leaves for garnish
This combination offers creamy, crunchy, fruity, and sweet all in one bite — a perfect base to build on for holidays, parties, or casual get-togethers.
Instructions
- Slice the Cheesecake – Cut into bite-sized squares or wedges (about 1–1.5 inches). Use a warm, clean knife for neat cuts.
- Prepare the Platter – Place a large wooden board or serving tray. Position small bowls for sauces.
- Arrange Cheesecake Pieces – Group cheesecake bites in clusters around the platter.
- Add Fruits – Place berries around the cheesecake for color and freshness.
- Add Cookies & Crunch – Fan graham crackers and shortbread around edges.
- Sprinkle Toppings – Scatter chocolate chips and nuts in small piles.
- Add Sauces – Pour chocolate and caramel into bowls or drizzle lightly.
- Final Touch – Tuck in fresh mint leaves for a pop of green.
Notes
- Assemble no more than 2 hours before serving. Refrigerate until 20 minutes before guests arrive.
- Swap in seasonal fruits or themed toppings (see “Cheesecake Platter Variations” section).
- For gluten-free guests, use gluten-free cookies.
More Customization Ideas
Once you’ve mastered the basic version, experiment with different colors, textures, and flavors to suit your theme or season.
Fruits (pick 3–5)
- Strawberries, blueberries, raspberries, blackberries
- Kiwi, mango, pineapple chunks
- Peach or nectarine slices (in summer)
- Red or green grapes
- Dried apricots or cranberries for fall and winter
Sweet Accompaniments
- Chocolate chunks (milk, dark, or white)
- Crushed cookies or brownie bites
- Chopped nuts (pistachios, almonds, walnuts)
- Toasted coconut or mini chocolate candies
- Edible flowers for a decorative touch
Sauces & Drizzles
- Chocolate, caramel, or berry coulis
- Honey or maple syrup
- Lemon curd or fruit preserves
Garnishes
- Fresh mint or basil leaves
- Dusting of cocoa powder, cinnamon, or powdered sugar
- Candied citrus peel for a festive touch
Thematic Cheesecake Platter Variations
Once you’ve built your base platter, you can switch up ingredients and decorations to match the season or occasion. These themed ideas not only add visual excitement but also help your post rank for additional keyword phrases.
Holiday Cheesecake Platter
Add a festive twist by including:
- Gingerbread cookies or crushed gingersnaps for a warm spice note
- Sugared cranberries or pomegranate seeds for sparkle
- White chocolate bark or peppermint bark pieces
- A few rosemary sprigs for a fresh, wintry touch
- Optional: dust lightly with powdered sugar to mimic snow
Chocolate Lover’s Cheesecake Platter
Perfect for birthdays, anniversaries, or Valentine’s Day.
- Start with a chocolate cheesecake base
- Add brownie bites or chocolate truffles for depth
- Include chocolate-covered pretzels for a salty balance
- Offer both dark and white chocolate sauces for drizzling
- Garnish with cocoa powder or shaved chocolate curls
Summer Berry Cheesecake Platter
Fresh, colorful, and ideal for warm-weather gatherings.
- Use a vanilla or lemon cheesecake as your base
- Add fresh strawberries, blueberries, raspberries, and blackberries
- Include shortbread cookies for a buttery crunch
- Pair with lemon curd or honey drizzle for brightness
- Finish with a few mint leaves for contrast
Equipment You’ll Need
You don’t need fancy tools—just a few basics to make your platter look professional and photo-worthy. These can easily be linked to recommended products for affiliate use.
Recommended Tools:
- Large Wooden Board or Marble Slab: The foundation of your cheesecake platter. Choose at least 12–16 inches wide.
- Small Ceramic or Glass Bowls: Perfect for holding sauces and drizzles.
- Sharp Knife: A thin, hot knife gives clean cheesecake cuts.
- Serving Utensils: Small tongs, dessert forks, and spoons for each section.
- Mini Labels or Flags (optional): Great for identifying cheesecake flavors or dietary sections.
What to Serve a Cheesecake Platter With:
A cheesecake platter, while certainly capable of standing alone as a show-stopping dessert, pairs beautifully with several complementary offerings that can elevate your entire dessert experience. Consider serving a selection of warm beverages that contrast with the cool creaminess of the cheesecake – a rich espresso, aromatic French press coffee, or assorted teas create perfect temperature and flavor contrasts. For those who enjoy wine pairings, a sweet dessert wine like Moscato d’Asti or a ruby port offers sophisticated accompaniment.
For a more elaborate dessert table, position your cheesecake platter as the centerpiece and surround it with simple supporting treats like chocolate-dipped strawberries, small macaron stacks, or candied nuts that complement without competing. If serving after a heavy meal, include some palate-cleansing elements like sparkling water with lemon or a light sorbet in tiny cups that guests can enjoy between cheesecake bites.
Consider seasonality as well – in summer, a pitcher of lemon-infused water or iced coffee provides refreshment, while cooler months call for mulled cider or hot chocolate with whipped cream. Remember that the goal is to enhance, not overwhelm, the star attraction of your cheesecake platter.
Top Tips for Perfecting Your Cheesecake Platter:
Temperature Management is Crucial
The perfect cheesecake platter strikes a delicate balance between safety and flavor. Remove your platter from refrigeration approximately 20-30 minutes before serving, this allows the cheesecake to soften slightly for optimal creaminess while still remaining properly chilled. However, never leave a cheesecake platter at room temperature for more than 2 hours, as dairy products can enter the food safety danger zone. For outdoor events during warmer months, consider using a platter with an ice compartment underneath or dividing your display onto smaller platters that can be brought out in rotation. When working with multiple cheesecake flavors, note that some varieties (particularly those with higher liquid content like fruit-swirled options) may soften more quickly than others.
Creating Visual Impact Through Height and Color
A truly memorable cheesecake platter engages the eye through deliberate variation in height, color, and texture. Create visual interest by placing some elements on small raised platforms—inverted teacups hidden under parchment paper work wonderfully as impromptu risers. Arrange components following the color wheel principles, positioning complementary colors adjacent to each other (think blueberries next to orange slices, or red strawberries near green kiwi). When selecting accompaniments, aim for a balance of colors: something red, something green, something purple or blue, and something yellow or orange provides a naturally appealing palette. For monochromatic themes, vary textures substantially—pair smooth cheesecake with rough chopped nuts, shiny glazed fruits, and crumbly cookie pieces to create complexity.
Smart Substitutions and Dietary Accommodations
Offer alternatives to make your cheesecake platter accessible to everyone. For lactose-sensitive guests, include a small section with dairy-free cheesecake bites made with plant-based cream cheese—marking this area with a subtle toothpick flag prevents cross-contamination. When serving guests with gluten restrictions, offer gluten-free cookies or brownie bites as dippers and ensure they’re positioned in their own section.
Nut allergies are common, so either skip nuts entirely or isolate them completely at one end of the platter with their own serving utensil. When substituting traditional cheesecake for dietary needs, focus on the presentation—for example, vegan options can be enhanced with edible flowers or premium cocoa dusting to ensure they look just as appealing as traditional portions. Always place a small printed menu card nearby listing major ingredients and identifying specialized dietary options.
Jump to Recipe
How to Make a Cheesecake Platter
Ingredients
Base Components
- 1 9-inch plain cheesecake store-bought or homemade
- 1 cup graham crackers
- 1 cup shortbread cookies
Fruits
- 1 cup strawberries halved
- 1 cup blueberries
- 1 cup raspberries
Sweet Toppings
- 0.5 cup chocolate chips milk or dark
- 0.5 cup chopped nuts walnuts, pecans, or almonds
Sauces & Drizzles
- 0.5 cup chocolate sauce
- 0.5 cup caramel sauce
Garnish
- fresh mint leaves
Instructions
- Step 1: Slice the cheesecake into bite-sized squares or wedges about 1–1.5 inches wide using a warm, clean knife for neat cuts.
- Step 2: Prepare the platter by placing a large wooden board or serving tray and position small bowls for sauces.
- Step 3: Arrange cheesecake pieces in clusters around the platter to create visual variety.
- Step 4: Add fruits around the cheesecake for pops of color and freshness.
- Step 5: Fan graham crackers and shortbread cookies along the edges of the board for crunch and structure.
- Step 6: Sprinkle chocolate chips and chopped nuts in small piles to add texture and richness.
- Step 7: Pour chocolate and caramel sauces into bowls or drizzle lightly over the platter.
- Step 8: Finish by tucking in fresh mint leaves for a fragrant, colorful touch.
Notes
- Assemble the platter no more than 2 hours before serving and refrigerate until 20 minutes before guests arrive.
- For gluten-free guests, use gluten-free cookies. Swap in seasonal fruits or themed toppings for variety.
- Avoid leaving cheesecake at room temperature longer than 2 hours.
- Avoid leaving cheesecake at room temperature longer than 2 hours
Storing and Reheating Tips:
Proper Storage for Maximum Freshness
To preserve both the quality and safety of your cheesecake platter, promptly disassemble it within two hours of serving—or within one hour in warmer conditions. Separate the components and store leftover cheesecake slices in an airtight container, placing parchment paper between layers to avoid sticking. Fresh fruits should be stored separately to prevent moisture from affecting the texture of the cheesecake. Refrigerate all dairy elements immediately at temperatures below 40°F (4°C).
Most cheesecake pieces will maintain optimal quality for 3-4 days when properly refrigerated. For longer storage, cheesecake freezes remarkably well—wrap individual pieces tightly in plastic wrap, then aluminum foil, and place in a freezer-safe container. Frozen cheesecake retains its quality for up to 1 month and serves as a wonderful ready-made treat for future cravings.
Reviving Leftover Components
Leftover cheesecake platter components can be refreshed for almost-new quality. For refrigerated cheesecake pieces, allow them to sit at room temperature for 15-20 minutes before serving to restore their creamy texture. Frozen pieces should thaw overnight in the refrigerator, never at room temperature. If the cheesecake seems dry after storage, a fresh drizzle of sauce or a light dusting of powdered sugar works wonders to restore moisture and visual appeal.
Leftover fruit can be blended into smoothies, reduced into compotes, or used as pancake toppings. Unused cookies and crackers should be stored in airtight containers to maintain crispness; if they’ve become soft, a quick 3-5 minute refresh in a 300°F oven can restore their crunch. Extra sauces and drizzles can be repurposed as ice cream toppings or stirred into morning oatmeal for a special breakfast treat.
For the most impressive second-day presentation, consider transforming leftovers into mini cheesecake parfaits—layer cheesecake pieces with fruit and sauce in clear glasses for a visually striking dessert that cleverly disguises the fact that you’re serving leftovers.
Conclusion
Creating a stunning cheesecake platter is truly an exercise in culinary creativity that rewards both the maker and the lucky recipients. The beauty of this dessert concept lies in its wonderful balance of impressive presentation and approachable execution. You don’t need professional pastry skills to assemble a platter that will have guests reaching for their phones to capture the moment before diving in to taste your creation.
What makes the cheesecake platter so special is its inherent versatility. Whether you’re working with homemade masterpieces or quality store-bought options, the canvas is yours to customize with seasonal fruits, decadent sauces, and textural elements that reflect your personal style and flavor preferences. The interactive nature of a platter encourages conversation and connection as guests gather around to create their perfect bites.
Remember that perfection isn’t necessary—in fact, the slightly rustic, abundant appearance of a well-crafted platter is part of its charm. Don’t stress over exact placement; instead, focus on color balance, textural variety, and providing enough space between elements to make each component visible and accessible.
As you venture into creating your own cheesecake platter masterpieces, I’d love to hear about your experiences and creative innovations! Drop a comment below sharing your favorite flavor combinations or tips you’ve discovered. And if you create your own version, please share photos on social media with the hashtag #MyDessertPlatter so we can all admire your creation!
Frequently Asked Questions
Can I use frozen cheesecake for my platter?
Yes! Store-bought frozen cheesecake works wonderfully for platters. Thaw according to package directions in the refrigerator (usually overnight), never at room temperature. Once thawed, cut into bite-sized pieces when still cold for cleaner edges.
What’s the best way to cut cheesecake into clean pieces for a platter?
For professional-looking cuts, chill the cheesecake thoroughly first. Use a long, thin knife dipped in hot water and wiped clean between each cut. For bite-sized pieces, mark a grid pattern on top before cutting, and clean your knife frequently for the sharpest edges.
What’s the best serving temperature for a cheesecake platter?
The ideal serving temperature is slightly chilled but not cold—about 20-30 minutes out of the refrigerator. This allows the flavors to bloom while maintaining structural integrity. In warmer environments, use a chilled platter as your base or consider serving in shifts.
How can I make my cheesecake platter more interactive?
Create a “build-your-own” station by arranging cheesecake pieces in the center surrounded by clearly separated toppings and sauces. Provide small dessert plates, forks, and serving spoons for each component. Consider adding creative suggestion cards with favorite combinations to inspire guests.
What’s the minimum number of components needed for an impressive platter?
A visually appealing platter can be created with just five elements: cheesecake pieces, two types of fruit, one crunchy element (nuts or cookies), and one sauce. Focus on color contrast and varying textures rather than quantity of ingredients.
Have you given our recipe a try ?
There are no reviews yet. Be the first one to write one.
Last Updated on October 4, 2025 by Janelle

- 25g Protein Cottage Cheese Waffles | Fluffy Meal Prep - October 25, 2025
- The Ultimate Guide to Homemade Cheese Crackers (5 Foolproof Recipes) - October 11, 2025
- Goat Cheese Pizza Ultimate Recipe Guide With 7 Variations - September 26, 2025